Certificate Setup
In a live payments environment the communication between your application and the Authipay Web Service must be encrypted. The certificates for this encryption will be included in a Starter Pack that is provided by the Authipay team as part of client onboarding.
Luckily the simulators in your Developer Playground work seamlessly with or without these certificates. This allows your to start your technical integration while you're waiting for your Starter Park. Then, once you've received and installed the certificates, you can continue seamlessly to develop against the simulators.
Note that certificate setup is not required for working against out simulators. This is only required in production.
To help you with the certficate install, here are some guides:
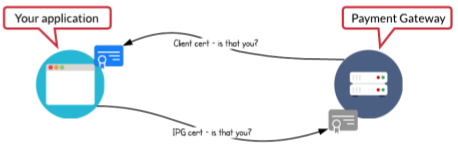
Certificate Overview
The Authipay encrypted connection work like this:
Your application holds a client certificate which uniquely identifies it to the Web Services API. And the Authipay Internet Payment Gateway has a server certificate which uniquely identifies it to your application.
And as a final step, your application has to do a basic authorisation (with a username & password) before being allowed to communicate with the Web Service.
Setup Prerequisites
You'll need the following to send transactions to the real API:
-
Username and Password for basic authentication.
- The username consist of your Store ID (e.g. 10012345678) and your User ID (e.g 7), concatenated as "WS10012345678._.7"
- Your StoreID, UserID and Password will be provided by AIBMS in your Starter Pack. U se dummy values with the simulators until you get these.
- Client certificate file (p12)
- For connecting with Java you need a ks-File, same naming convention, with the .ks file extension.
-
Server Certificate PEM File: The server certificate stored in the PEM file geotrust.pem which is required for authenticating the server running the Web Service API
- Same naming convention, with the .ks file extension
- For connecting with Java you need the truststore.ks-file
Install on MAC OS X
The P12 file:
- Double-click the client certificate p12 file
- Check the file name (which should be already set to the path of your client certificate p12 file). You will be asked to access the toolchain
- Provide the client certificate installation password.
The PEM file:
- Double-click the PEM file and add it to your toolchain. You may be prompted to input your own password.
- Now open a browser window and go to the URL: https://test.ipg-online.com/ipgapi/services/order.wsdl
- After requesting the URL, the server will ask your browser to supply the client certificate to making sure that it is talking to your application correctly. Since you have installed the certificate in the previous steps, it will appear in a dropdown list within the browser window. Select the certificate and press OK.
- Then, the Authipay Gateway sends its server certificate (identifying it uniquely) to you. This certificate is verified against the trusted one you have installed above. This is done automatically without prompting you for any input. Now a secure connection is established and all data transferred between your application and the Web Service API will be SSL-encrypted.
- Next, you will be prompted to supply your credentials for authorisation (as above)
- The Web Service API WSDL file is displayed
Install on Ubuntu
The P12 file:
- Double-click the client certificate p12 file
- Check the file name (which should be already set to the path of your client certificate p12 file).
- Provide the client certificate installation password and click on ‘Import’
The PEM file:
- No need to do anything, just use the cert as part of your requests, i.e. as `--cert` parameter when you’re making a CURL request.
Install on Windows
The P12 file:
- Double-click the client certificate p12 file
- Click “Next”. Check the file name (which should be already set to the path of your client certificate p12 file). Click “Next”
- Provide the client certificate installation password and click “Next”
- Choose the option Automatically select the certificate store based on the type of certificate and click Next. This will place the certificate in your personal certificate store (more precisely in the local Windows user’s personal certificate store)
- Check the displayed settings and click Finish. Your client certificate is now installed.
The PEM file:
- Now, you have to install the server certificate. The most straightforward way to do this is to open the folder in which you have saved your server certificate PEM file and rename the file to geotrust.crt.
- Click Install Certificate. This starts the same wizard as above.
- Click Next. Select Place all certificates in the following store and browse for the Trusted Root Certification Authorities folder. Click Next.
- Check the displayed settings and click Finish (you might have to confirm the installation). The server certificate is now installed in the local computer’s trusted certificates store. Here, Microsoft Internet Explorer can lookup the server certificate for verifying the Authipay Gateway server certificate received when calling the WSDL URL above.
- Now, open a browser window and go to the URL:https://test.ipg-online.com/ipgapi/services/order.wsdl in the address field
- After requesting the URL, the server will ask your browser to supply the client certificate to making sure that it is talking to your application correctly. Since you have installed the certificate in the previous steps, it is transferred to the server without prompting you for any input (i.e. you will not notice this process). Then, the Authipay Gateway sends its server certificate (identifying it uniquely) to you. This certificate is verified against the trusted one you have installed above. Again, this is done automatically without prompting you for any input. Now, a secure connection is established and all data transferred between your application and the Web Service API is SSL-encrypted.
- Next, you will be prompted to supply your credentials for authorisation (See above).
- The Web Service API WSDL file is displayed