Testing Dynamic Currency Conversion
Dynamic Currency Conversion refers to a process whereby the amount of a transaction (Visa or MasterCard) is converted by a merchant to the currency of the payment card's country of issue at the point of dcc. For example a user purchasing a product valued in USD and paying with a card issued in Ireland (EUR) will have the value of USD converted into the equivalent value of EUR when the transaction is created. This will then represent the actual amount that will be billed to the payee's card.
Note the conversion rate is set when the transaction is initally created. This means DCC can only be used for transactions which are setteled immediately such as Sale & ForceTicket.
The steps below will show you how to use the DCC simulator to build a transaction. Our examples here uses a simple cURL request, but the same steps apply to any coding language.
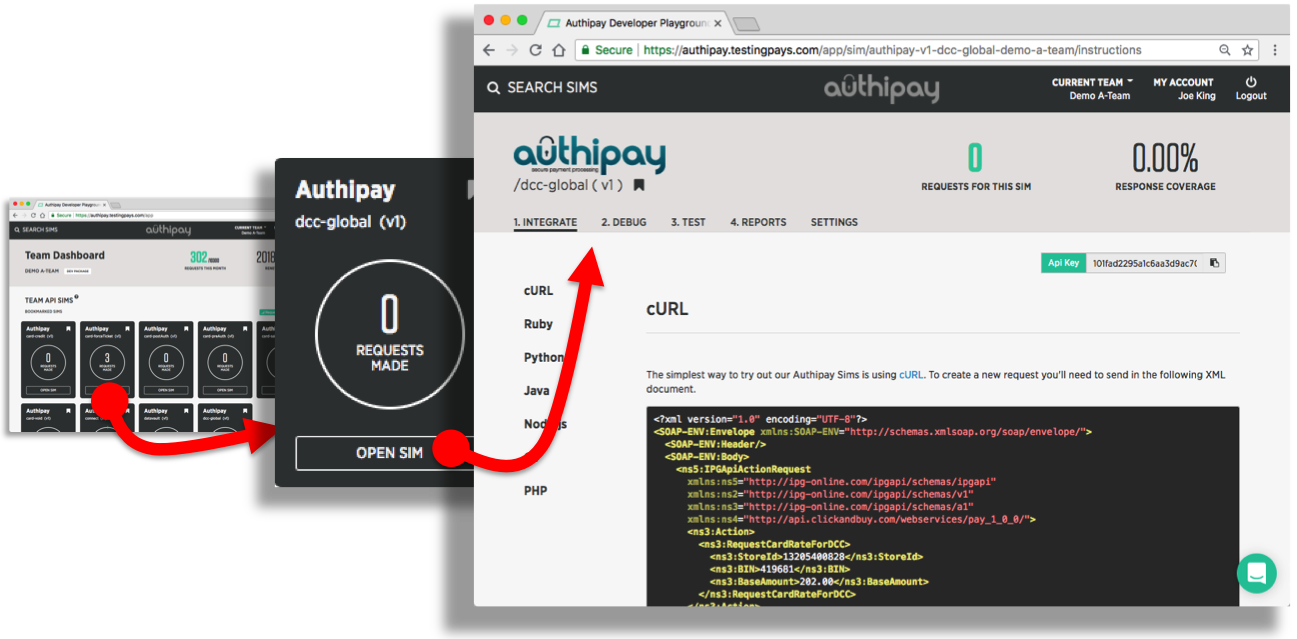
Step 1: Open the DCC simulator
For the purposes of making test DCC transaction, you'll be using the DCC simulator in the Authipay Developer Playground.
To open the simulator interface, login to your Authipay Developer Playground account and click "OPEN" on the "card-dcc" bookmark on your dashboard. You'll see the following sections in your simulator:
- Integrate: coding instructions in various languages to help you connect your code to the simulator.
- Debug: use the Live Log to watch transctions being processed in real-time. Or download the file-based logs.
- Test: a map of real DCC response codes that you can trigger with values in your test requests. Or custom your own.
- Reports: real-time test reports showing the frequency and coverage of your DCC testing.
- Settings: real-world settings you can activate for your testing, including latency delays, etc.
Step 2: Build the XML body
In a nutshell: your code must first assemble a XML document with the fields for a DCC transaction, then wrap the XML into the body of a SOAP request.
The XML body of the DCC transaction requires you pass along three parameters within the RequestCardRateForDCC block.
- StoreId, your Store ID from Authipay. Authipay uses this to derive the base currency for your account. We will accept any string within 1 - 20 characters long.
- BIN, the credit cards’ Bank Identifier Number (first 6 digits of credit card number).
- BaseAmount, the amount to be converted (optional). When no amount is given in the request, no amount will be returned, only the conversion rate.
You can trigger different response from the simulator by changing the values you use in the requests. By default, the simulator will use BaseAmount value as the trigger value.
Below is an example SOAP request containing the minimum XML fields needed for a DCC transaction.
<?xml version="1.0" encoding="UTF-8"?>
<SOAP-ENV:Envelope xmlns:SOAP-ENV="http://schemas.xmlsoap.org/soap/envelope/">
  <SOAP-ENV:Header/>
  <SOAP-ENV:Body>
    <ns5:IPGApiActionRequest xmlns:ns5="http://ipg-online.com/ipgapi/schemas/ipgapi" xmlns:ns2="http://ipg-online.com/ipgapi/schemas/v1" xmlns:ns3="http://ipg-online.com/ipgapi/schemas/a1" xmlns:ns4="http://api.clickandbuy.com/webservices/pay_1_0_0/">
      <ns3:Action>
        <ns3:RequestCardRateForDCC>
          <ns3:StoreId>13205400828</ns3:StoreId>
          <ns3:BIN>419681</ns3:BIN>
          <ns3:BaseAmount>202.00</ns3:BaseAmount>
        </ns3:RequestCardRateForDCC>
      </ns3:Action>
    </ns5:IPGApiActionRequest>
  </SOAP-ENV:Body>
</SOAP-ENV:Envelope>
For the purposes of making a manual cURL transaction, paste the above example into a text editor and save it locally as an XML file, say, "example.xml".
Our Tip: include all xmlns
Make sure you include all xmlns attributes (aka XML namespaces) mentioned in this guide. Without these the XML may not be parsed correctly on the server end.
Step 3: Send the request to the DCC simulator
Next, your code needs to send the assembled SOAP request to the DCC simulator. The URL to POST to can be found under the "Integration" tab of the simulator - make sure to copy&paste this URL from your simulator as it contains your unique API_KEY.
The example show below shows how to make a DCC transaction using cURL. The "example.xml" contains the constructed SOAP request.
curl -X POST -d @example.xml \
    https://api.testingpays.com/API_KEY/authipay/v1/ipgapi/services
api_key is placeholder for your actual api key that you will find on your simulator pages in the developer playground.
Step 4: Parse the DCC response
The simulator will first validate your request. If it detects any issues, you'll see a verbose response indicating what is wrong with the request.
If the simulator detects no issues, then it will simulate a DCC response. This is an XML document that contains information about the transaction: the result from the gateway, the bank authorisation result, DCC information, etc.
The example show below shows the response to a DCC transaction sent manually by cURL command to the simulator.
<SOAP-ENV:Envelope xmlns:SOAP-ENV="http://schemas.xmlsoap.org/soap/envelope/">
  <SOAP-ENV:Header/>
  <SOAP-ENV:Body>
    <ipgapi:IPGApiActionResponse xmlns:ipgapi="http://ipg-online.com/ipgapi/schemas/ipgapi" xmlns:a1="http://ipg-online.com/ipgapi/schemas/a1" xmlns:v1="http://ipg-online.com/ipgapi/schemas/v1">
      <ipgapi:successfully>true</ipgapi:successfully>
      <ipgapi:CardRateForDCC>
        <v1:InquiryRateId>253824</v1:InquiryRateId>
        <a1:DccOffered>true</a1:DccOffered>
        <a1:ForeignCurrencyCode>978</a1:ForeignCurrencyCode>
        <a1:ForeignAmount>0.00</a1:ForeignAmount>
        <a1:ExchangeRate>1.00</a1:ExchangeRate>
        <a1:ExpirationTimestamp>2018-09-07T7:55:35Z</a1:ExpirationTimestamp>
        <a1:MarginRatePercentage>3.000</a1:MarginRatePercentage>
        <a1:ExchangeRateSourceName>TESTING PAYS BANK</a1:ExchangeRateSourceName>
        <a1:ExchangeRateSourceTimestamp>2018-09-07T8:55:35Z</a1:ExchangeRateSourceTimestamp>
      </ipgapi:CardRateForDCC>
    </ipgapi:IPGApiActionResponse>
  </SOAP-ENV:Body>
</SOAP-ENV:Envelope>
The important parameter to look for in the response is DccOffered. This parameter will be either true or false. If offered you can then submit the returned InquiryRateId with Sale and ForeceTicket transactions. Doing so will apply the Conversion Rate recieved to the transaction.
You can trigger different response from the simulator by changing the values you use in the requests. By default, the simulator will use BaseAmount value as the trigger value.
Our Tip: remember the OrderId
Each transaction will get its own OrderId. Your code should store this in persistent storage. It's an important reference when a dispute or chargeback arises. We also recommend storing the IpgTransactionId; you'll use it in support requests to AIBMS.