Make Your First Request
There's no better way to learn than to see a transaction in action. Here are the ways to send your first WebServices test transaction in the Developer Playground.
Play Test Request' button
The quickest way to see a WS API transaction? Look for the "Play Test Request" buttons on any of the simulators. This will fire an actual test request to that simulator, as if you've made the request yourself.
Examine the request and response as they fire in real-time.
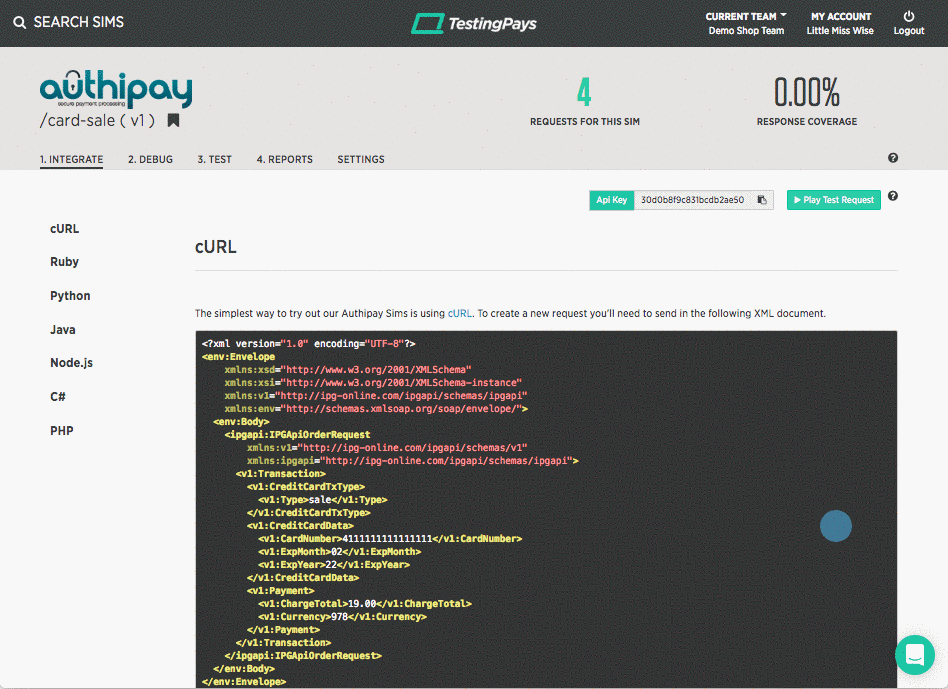
Make a cURL request
Another easy way to try your own test request? Make a cURL request from your local machine to the simulator. This method is described in the "Integration" tab of every WS API sim, including copy&paste commands for you to run in a terminal/command line on your local dev machine.
Code it yourself
The following will show you how straightforward it is to code your first transaction. In this example, we're using the WebService API Sale simulator.
Whatever your coding language, first thing you will need is a library to build up an XML payload. For example, in Ruby, we use the Nokogiri gem, which is part of the standard Ruby-on-Rails distribution.
Our Tip: include all xmlns
Make sure you include all xmlns attributes (aka XML namespaces) mentioned in this guide. Without these the XML may not be parsed correctly on the server end.
The XML body of the card Sale has 2 main parts: (1) the CreditCardData and (2) Payment.
- The card data structure holds all the information about the card that your customer entered in on your checkout form and includes: the card number (PAN), expiry month, expiry year and card code value (a.k.a. CVV)
- The payment block has the amount to be debited ("ChargeTotal") and the currency (currency codes follow the ISO-4217).
Once you have that XML constructed, send it as a POST request to the card Sale simulator (copy&paste the POST URL from the "Integration" tab of the simulator).
The simulator will first validate your test request is well-formed, that is, does the XML payload have the necessary values to carry out the sale simulation? If the simulator detects any issues, it will respond with verbose validation reasons so you quickly learn what needs to change.
Finally: your code has to handle the simulator response. It will send back an XML document that contains information about the transaction: the result from the gateway, the bank authorisation result, DCC information, etc. Your code must parse this.
The important parameter to look for in the response is the ApprovalCode.
- If the value starts with ‘Y’, that means everything went well, and the transaction was approved.
- If the value here starts with an ‘N’ followed by a colon ‘:’ and a negative number, that means the transaction failed.
Our Tip: rememer the OrderId
Each transaction will get its own OrderId, which you should store internally to your systems, should you need it later for chargebacks / disputes. You can also store the IpgTransactionId as well, making sure that lookups for these disputed transactions are short when you need to contact Authipay.