Testing Card Void
The Void operation of the Web Services API is used to cancel a Sale, PreAuth, ForceTicket or Credit transaction. This differs from a Refund operation as the funds are never taken out of the users account.
The steps below will show you how to use the Void simulator to build a transaction. Our examples here uses a simple cURL request, but the same steps apply to any coding language.
Step 1: View the Void simulator
For the purposes of making test Void transaction, you'll be using the Void simulator in the Authipay Developer Playground.
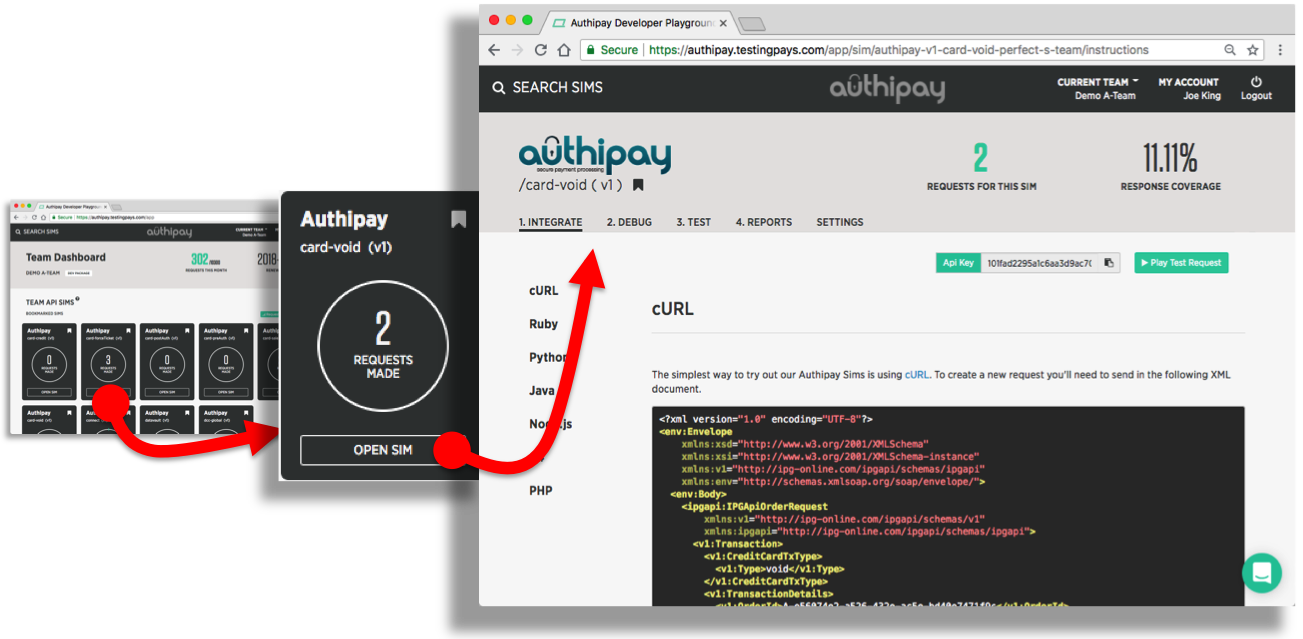
To open the simulator interface, login to your Authipay Developer Playground account and click "OPEN" on the "card-void" bookmark on your dashboard. You'll see the following sections in your simulator:
- Integrate: coding instructions in various languages to help you connect your code to the simulator.
- Debug: use the Live Log to watch transctions being processed in real-time. Or download the file-based logs.
- Test: a map of real Void response codes that you can trigger with values in your test requests.
- Reports: real-time test reports showing the frequency and coverage of your Void testing.
- Settings: real-world settings you can activate for your testing, including MCC 6012, DCC, latency delays, etc.
Step 1: Build the XML body
In a nutshell: your code must first assemble a XML document with the fields for a Void transaction, then wrap the XML into the body of a SOAP request.
The XML body of a Void transaction requires an OrderId and a TDate. These are used to identify the transaction which you want to void and where returned in the original transactions response.
Below is an example SOAP request containing the minimum XML fields needed for a Void transaction.
<?xml version="1.0" encoding="UTF-8"?>
<env:Envelope xmlns:xsd="http://www.w3.org/2001/XMLSchema" xmlns:xsi="http://www.w3.org/2001/XMLSchema-instance" xmlns:v1="http://ipg-online.com/ipgapi/schemas/ipgapi" xmlns:env="http://schemas.xmlsoap.org/soap/envelope/">
  <env:Body>
    <ipgapi:IPGApiOrderRequest
      xmlns:v1="http://ipg-online.com/ipgapi/schemas/v1"
      xmlns:ipgapi="http://ipg-online.com/ipgapi/schemas/ipgapi">
      <v1:Transaction>
        <v1:CreditCardTxType>
          <v1:Type>void</v1:Type>
        </v1:CreditCardTxType>
        <v1:TransactionDetails>
          <v1:OrderId>62e3b5df-2911-4e89-8356-1e49302b180</v1:OrderId>
          <v1:TDate>1190244932</v1:TDate>
        </v1:TransactionDetails>
      </v1:Transaction>
    </ipgapi:IPGApiOrderRequest>
  </env:Body>
</env:Envelope>
For the purposes of making a manual cURL transaction, paste the above example into a text editor and save it locally as an XML file, say, example.xml.
Our Tip: include all xmlns
Make sure you include all xmlns attributes (aka XML namespaces) mentioned in this guide. Without these the XML may not be parsed correctly.
Step 2: Send the request to the Void simulator
Next, your code needs to send the assembled SOAP request to the Void simulator. The URL to POST to can be found under the "Integration" tab of the simulator - make sure to copy&paste this URL from your simulator as it contains your unique API_KEY.
The example show below shows how to make a Void transaction using cURL. The example.xml contains the constructed SOAP request.
curl -X POST -d @example.xml \
    https://api.testingpays.com/API_KEY/authipay/v1/ipgapi/services
API_KEY is placeholder for your actual API key that you will find on your simulator pages in the Developer Playground.
Step 3: Parse the Void response
The simulator will first validate your request. If it detects any issues, you'll see a verbose response indicating what is wrong with the request.
If the simulator detects no issues, then it will simulate a Void response that contains information about the transaction such as: the result from the gateway, the bank authorisation result, DCC information, etc.
Note that unlike the other sims Void will always return a positive result if the validations are passed.
The example show below shows the response to a Void transaction sent manually by cURL command to the simulator.
<SOAP-ENV:Envelope xmlns:SOAP-ENV="http://schemas.xmlsoap.org/soap/envelope/">
  <SOAP-ENV:Header/>
  <SOAP-ENV:Body>
    <ipgapi:IPGApiOrderResponse xmlns:ipgapi="http://ipg-online.com/ipgapi/schemas/ipgapi" xmlns:a1="http://ipg-online.com/ipgapi/schemas/a1" xmlns:v1="http://ipg-online.com/ipgapi/schemas/v1">
      <ipgapi:ApprovalCode>Y:398852:A7413479360:PPXP:3862</ipgapi:ApprovalCode>
      <ipgapi:AVSResponse>PPX</ipgapi:AVSResponse>
      <ipgapi:Brand>VISA</ipgapi:Brand>
      <ipgapi:CommercialServiceProvider>AIBMS</ipgapi:CommercialServiceProvider>
      <ipgapi:OrderId>A-midfnSAapzuAQaWcD3fS+SLuczO+9z6OKCS7ug==</ipgapi:OrderId>
      <ipgapi:IpgTransactionId>7413479360</ipgapi:IpgTransactionId>
      <ipgapi:PaymentType>CREDITCARD</ipgapi:PaymentType>
      <ipgapi:ProcessorApprovalCode>398852</ipgapi:ProcessorApprovalCode>
      <ipgapi:ProcessorReferenceNumber>398852</ipgapi:ProcessorReferenceNumber>
      <ipgapi:ProcessorResponseCode>00</ipgapi:ProcessorResponseCode>
      <ipgapi:ProcessorResponseMessage>AUTH CODE:398852</ipgapi:ProcessorResponseMessage>
      <ipgapi:ReferencedTDate>-2062458867</ipgapi:ReferencedTDate>
      <ipgapi:TDate>1537541133</ipgapi:TDate>
      <ipgapi:TDateFormatted>2018.09.21 14:45:33</ipgapi:TDateFormatted>
      <ipgapi:TerminalID>11562788</ipgapi:TerminalID>
      <ipgapi:TransactionResult>APPROVED</ipgapi:TransactionResult>
      <ipgapi:TransactionTime>1537541133</ipgapi:TransactionTime>
    </ipgapi:IPGApiOrderResponse>
  </SOAP-ENV:Body>
</SOAP-ENV:Envelope>
The important parameter to look for in the response is the ApprovalCode.
- If it starts with ‘Y’, then the transaction was approved.
- If it starts with ‘N’ followed by a colon ‘:’ and a negative number, that means the transaction failed and the negative number is the response code.
Our Tip: remember the OrderId
Each transaction will get its own OrderId. Your code should store this in persistent storage. It's an important reference if any future dispute or chargeback arises. You could also store the IpgTransactionId as well; this will help you in any support requests to Authipay.